Showing posts with label Christmas Crafts. Show all posts

Monday, 21 December 2015

21st December: Crochet Christmas Decorations

Hi all, hope you had a lovely weekend, last few days and then it's Christmas!!

Here's a few photos of some festive crochet pieces I've made recently and I've included links under the photos to where you can find free patterns to make them too. Most took about half an hour each to make and can be strung together to create a garland or hung individually on your tree!


Em x

Thursday, 17 December 2015

17th December: Handmade Gifts No.4 - Crochet Infinity Scarf - Free Crochet Pattern!

I'm usually very shy about showing off my creations, worrying about what others will think (worrying is my middle name!), but I'm so over the moon with how this crochet infinity scarf turned out that I want to show it off! I only taught myself how to crochet a few months ago and became a bit crochet-obsessed in the process. This was the second scarf I made having made myself a mesh-style scarf first. This scarf I've made for my best friend, Jess, as part of her Christmas present and I do hope she likes it.

 
I've made it in a lovely light pink colour with a soft aran & alpaca yarn. Jess loves this kind of colour so I think I've chosen well. I decided to do this scarf as an infinity scarf as they're my favourite and I didn't really follow a pattern for this but instead chose my favourite crochet stitches to put together to make a nice scarf with a pretty shell pattern in the middle. It took me a LONG time to make the scarf and at one stage I had to back track quite a lot as I changed my mind halfway through (as you do!). I'm hoping I'll get quicker at making this type of thing as time goes on and by the end I was speeding through the stitches. There's certainly something very therapeutic about sitting down with a crochet hook and yarn and creating something. Some might add that a cup of tea goes down well at the same time but I'm one of those strange people that doesn't like any hot drinks so I'll stick with a glass of water or lactose free milk (lactose intolerant too!).
 
Here are instructions on how to crochet this scarf. I've used abbreviations and I'm afraid there aren't any instructions on the different stitches but if anyone gets stuck please please ask me and I'll be happy to help. This is my first ever time at writing out my own crochet pattern and I've checked it numerous times! It was fun to be able to make up my own based on what I learned when making my last infinity crochet scarf and choosing an array of stitches (which was also good practice).
 
You Will Need:
7mm Crochet Hook
2x 100g balls of 4" Aran Yarn
Scissors
 
Abbreviations:
ss - Slip Stitch
dc - Double Crochet
tr - Treble Crochet
dtr - Double Treble Crochet
 
Important Notes:
I've used UK crochet terms, please see below for a conversion chart for reference. I've split my instructions into the three different sections of this scarf to make things easier. I also used 2 balls of yarn (as outline above) simultaneously to add extra thickness to this scarf.


Instructions:

 
Section 1:
  • Chain 180. ss to first to create a ring, but make sure you check that the chain hasn't become twisted before doing the ss.
  • Chain 1, then dc around and ss to first.
  • Chain 3, then tr around and ss to first.
  • Chain 4, then dtr around and ss to first.
 
Section 2:
  • Row 1:
    • Chain 1, 1 dc in 2nd chain from hook. *Chain 1, 1 dc in each of the next 4 stitches. Chain 2, 1 dc in each of the next 4 chains. Repeat from * until the last 2 chains. 1 dc in each of these last 2 stitches. Ss to first.
  • Row 2:
    • Chain 1, *1 tr, chain 2, 1 tr in 1-chain space (created in previous row). 2 tr, chain 1, 2 tr in 2-chain space (created in previous row). Repeat from * until round is finished. Chain 2 and then ss to first.
  • Row 3:
    • Chain 1, *2 tr, chain 1, 22 tr in the 2-chain space. 1 tr, chain 2, 1 tr in the 1-chain space (so kind of the opposite of what you were doing in row 2). Repeat from * until the round is finished, chain 2 and ss to first.
 
Section 3:
  • Chain 4, dtr around and ss to first.
  • Chain 3, tr around and ss to first.
  • Chain 1, dc around and ss to first.
  • Fasten off and thread in any loose ends.
 
Hopefully that all makes sense! I've done it nice and simple I think and the scarf was good fun to make. The trickiest part is making sure you don't get the ring twisted at the start. If anyone would like the pdf document of the crochet pattern to print then please let me know and I'll send it to you.
 
I'm really pleased at how the scarf turned out; it's quite weighty but lovely and soft so hopefully won't be scratchy around the neck. I really hope Jess likes it!
 
If anyone else would like me to make them one, for themselves or as a gift, please do let me know!
 
Here I am modelling said scarf, this one was too nice to model on the dog, not to mention too big!
 
And here it is all wrapped up, ready to give to Jess!
 
Em x

Tuesday, 15 December 2015

15th December: Christmas Card Making


This year I set myself the challenge of making Christmas cards as opposed to buying them. I still had a few lying around from last year that I bought and so I've used them to save me having to make quite so many cards. I don't send all that many out anyway and hopefully family and friends will appreciate that I sat up until late last night gluing, cutting, measuring and cursing to make their festive cards!

I'm trying to use up old supplies of Christmas craft stuff that I've collected over the years; I used to have just one plastic under-bed box full of craft materials, which has become two, three, four, maybe five boxes! My friend used to work at a craft design company and so got the chance to buy lots of old stock which she'd then share with me too as I love crafting. I did however buy a paper craft pack recently called 'Folk Christmas' and I love the different papers and tags in there. Next year I'm going to have a go at making my own gift tags too (this year I've been using up old tags, ones I make from cutting up old Christmas cards and from ones I've bought in the January sales).

Here's a few photos of my favourite handmade cards, I love the folk and vintage style patterns! I seem to be finding lots of the little squares that come off the back of the foam squares used for decoupage, they fly everywhere!


Em x

14th December: Handmade Gifts No.3 - Mini Fruit Loaves, Cushions and Ipad Cases!

Just a few more handmade gift ideas for anyone who may be struggling for ideas. All of these were easy to make/bake/sew.

Mini Fruit Loaves
Jack bought me a lovely mini loaf pan from Lakeland a few years ago and I love it! It's heavy and they usefully have loose-bottoms. So far I've only done simple mini fruit loaves using the tray but I think some mini lemon drizzle loaves would be very good, that's going on one of my lists for a rainy day!

Please let me know if you'd like the recipe I use for making my boozy fruit loaves
 
I used some cellophane and ribbon to keep my mini fruit loaves fresh


Cushions
I made some cushions for my parents' house in France a few years ago. I opted for feather-filled cushions from John Lewis, but Dunelm also have a great range with lots of different shapes and sizes. I bought some fabric from Ebay in two varying colours and I sewed a nice piping around the edge of the cushions too. This was a cheap gift idea and I loved spending the evenings doing some sewing - this year crochet has definitely replaced my sewing obsession, who knows what it will be next year!


Ipad Sleeve/Case
I made this for my Mum's friend and was so pleased with how it turned out that I also made myself one. It doesn't require a lot of fabric - I made this with a fat quarter, some wadding, a few beads and some ribbon for edging. Again, this was a very simple sewing project; I used my sewing machine to make the main sleeve and then everything else was hand-sewn. I used a bit of elastic and a button to stop the ipad sliding back out.


Have a good day!
 
Em x

Friday, 11 December 2015

Friday's Photo - Christmas Wreath Sitting Pretty


The wreath is now in position on our front door, it looks lovely at night when the outdoor light glows, but I quickly took this photo this morning before I left for work. I've already had family asking me to make them one next year, so I look forward to making a few different ones next year.

Have a lovely weekend!

Em x

Thursday, 10 December 2015

10th December: Mini Christmas Sewing Project

Here are a couple of photos of some simple felt Christmas trees I made to hang on our tree. It was an easy hand-sewing project and I decided to accessorise my trees with sequins and beads, but you could also do mini patchwork trees, use ribbon or whatever you have handy.

 
Making a start...
 
Beads now sewn on and ready to sew around the edges and stuff with a bit of wadding
 
Finished little tree!
 
And here's my little sequin one too!

Wednesday, 9 December 2015

9th December: Christmas Wreath Making


Last night I had a great time attending a Christmas wreath making evening at Shaw House, Berkshire. The event was organised by the local St Marks School in Cold Ash to help raise money for the school and everyone seemed to have a fantastic time, I know I did. The location made it extra special in the beautiful historic Shaw House and the atmosphere was great. We all chatted away (it was lovely to meet people) and the Christmas music in the background made it feel really festive, I'm certainly in the Christmas spirit now!

Beautiful Shaw House (Google Image)
 
Holly and Kylie hosted the evening and were friendly and helpful as they wandered around, while Lynn showed us how to make a wreath and gave us some very useful tips. I really wanted to have a go at making a wreath but honestly wasn't sure how to start! There was plenty of different foliage to choose from as well as other colourful accessories. I decided I didn't want too much colour on my wreath and instead wanted lots of texture, especially using the holly leaves which are one of my favourites despite the fact my hands are now shredded (I'll remember gloves next time).
 
Choosing our foliage and other accessories
 
Lynn demonstrated how to start the wreath, using evergreen foliage around the very edge of the oasis to hide it. The oasis had been soaked for hours and the first thing I did was pour the excess water straight into my lap haha! I found going around the edge with the initial foliage layer quite easy, but after that I felt a bit like "where do I go next?!".
 
 
Some of my chosen foliage
 
Here goes...
 
Made a start...
 
Filling in the top...
 
Having a minced pie and mulled wine break!
 
Pretty foliage
 
Getting there...
 
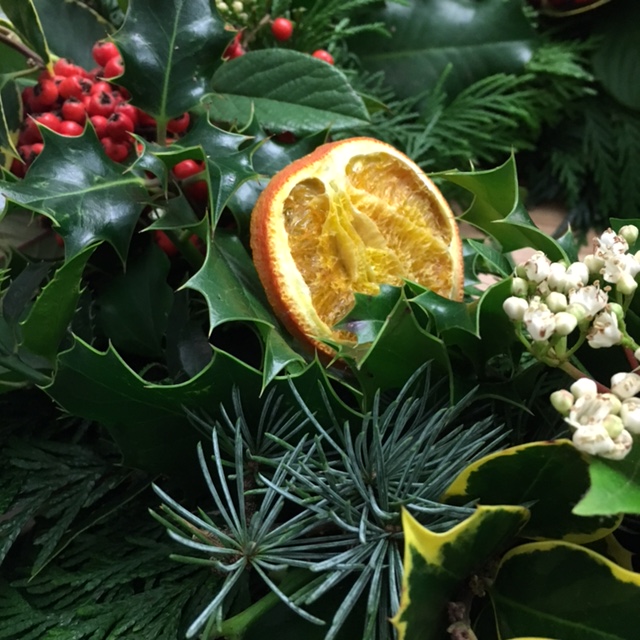
I decided I just wanted some white and red on my wreath to add a bit of colour; Lynn told us working in odd numbers is best when it comes to wreaths or any flower arranging for that matter. I loved the dainty little white flowers contrasting with the festive red berries. Lots of people used lovely Ivy to trail down from the bottom of their wreaths, another lady I saw had used lovely little fairy lights in her wreath; it was so lovely looking at everyone's handiwork.
 
Finally I finished my wreath off with a few dried orange slices; they smell amazing and added just a little more colour to my wreath. At that point I think stopped because it's oh so tempting to keep sticking bits of foliage into the wreath!
 
Ready to put on my wreath...
 
Ta-Da!
 
I'm really pleased with the end result; lots of texture, different shades of green with a bit of Christmas colour! For my first attempt at wreath making I'm rather impressed with my efforts and now look forward to making more in the future! I think some little coloured wooden Christmas toys would also look great on a wreath (little nutcracker soldiers, little trains and presents), as would bows and ribbons - so many ideas now!
 
Here's the finished wreath, Jack held it up for me last night so I could take a proper photo. I just need a wreath hook for the door now so it can have pride of place on our front door!
 
I had such a great evening, I love doing crafty things and it was nice to try something new. I can't wait to make one again next year and would definitely go to the evening again next year if they arrange it :-)
 
Em x